Saturday, October 30, 2010

Sewing for Less - Repurposing #3

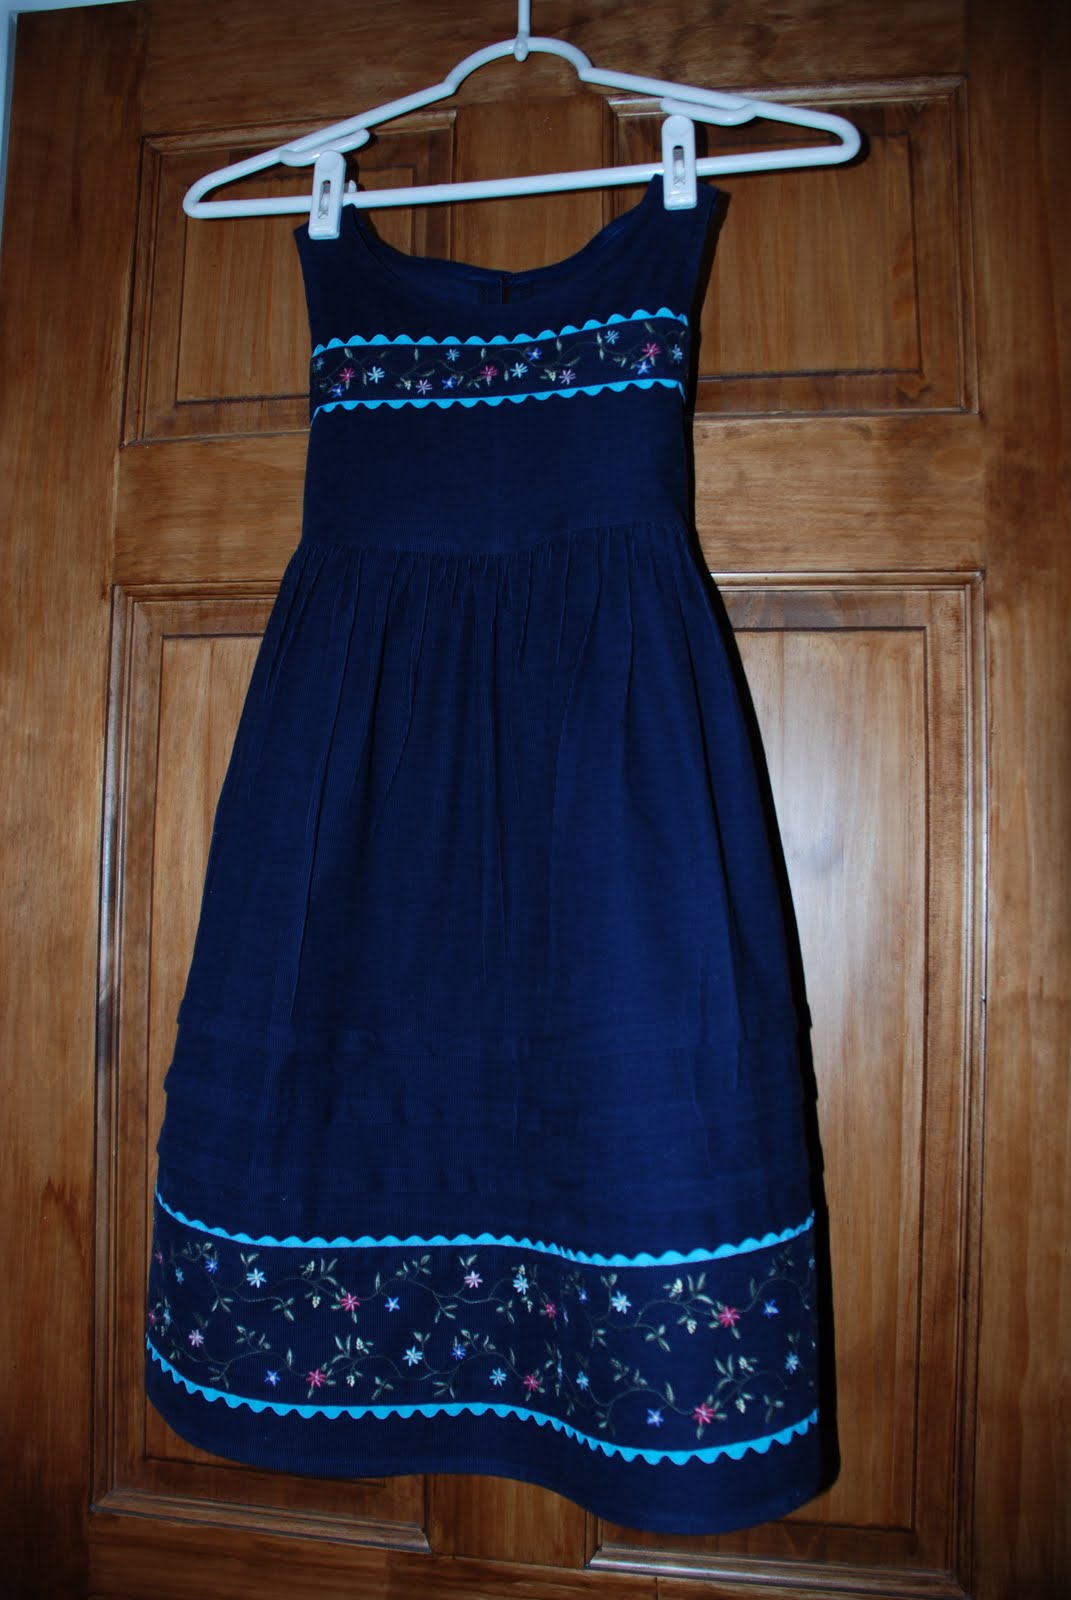
Here's a jumper for my daughter that I just completed this afternoon. I used Simplicity 5226, view B, which on the pattern is shown as a slip dress, designed to be worn underneath the view A dress. However, this pattern works fine as a stand-alone dress, and has the added benefit of a keyhole back, so it just slips over the head and doesn't require buttonholes.

Where did I get my fabric, you might ask? How long did it take me to do that fancy embroidery? Because this is a re-purposing post, you know I had to start with something else, right?


How about this woman's corduroy jumper? Thank you, Goodwill! Women's dresses and jumpers are a terrific value, because of the volume of fabric they give you to work with. This jumper was a size large and had a full, gathered skirt...


and the added bonus of embroidered bands for inspiration.


I wanted to use the bodice embroidery on the bodice of my dress, but it was too far down and close to the skirt seam, so I cut the embroidered band off, then cut out my bodice pieces, then re-positioned the embroidered band where I wanted it, turning under about 3/8" on the top and bottom, and inserting some Wrights Medium Rick Rack in Aqua Blue.


Then, I decided to use the same treatment on the skirt, but because the placement of embroidered band on the dress worked fine just where it was, I opted to make a pleat above and below the embroidery and insert the rick rack there. Topstitching close to the folded edge holds the trim in place, and bodice and skirt now have a uniform look.


I also ended up sewing 3 growth pleats (barely visible in photo) in the skirt to bring it up to a better length for my daughter. The idea of growth pleats is to build in extra length so that when a growth spurt happens, one or more of the pleats can be removed to add length and prolong the life of the garment. Realistically, I won't do this, though, because corduroy is notorious for showing creases, but I still like the way it looks.


Here's a side-by-side showing the before (left) and after (right). I'm not exactly sure what I paid for the jumper, but probably not more than $3, and I also purchased 1 package of rick rack (I had one on hand from a previous project already). Including thread, this project cost me less than $5. Our local Goodwill marks down clothing every week to 29 cents, so I could've made this dress for much less.

It saddens me to hear people say that sewing is just too expensive these days. And I can see why they think that. We are so accustomed to buying cheap, imported goods from big-box stores, that spending a little more for off-the bolt fabric seems prohibitive. But, there are other alternatives! I have been frequenting thrift stores for a few years now and I can testify that if you can look beyond what the item IS to what it CAN BE...you will find an unlimited amount of resources at your disposal...sometimes for pennies.

Saturday, June 27, 2009

Sewing for Less - Repurposing #2

In my previous "Sewing For Less - Repurposing" post I showed you how I turned a $0.29 men's dress shirt into a toddler dress. This time, I'm starting with a $1.00 curtain panel I purchased at a yard sale last week.


Curtains can be a fantastic source of yardage at a great price. Especially for embroidered eyelets, or other bordered fabrics. Some pre-made curtains are very poor quality, however, so it's helpful if you can develop a "feel" for good fabric. It just takes a bit of practice.


This fabric is a polyester/cotton blend, not fantastic quality, but it was the embroidered eyelet border that really caught my eye. I knew I could do something with that. It was a small valance panel, approximately 16 1/2" long. Eyelet fabric by-the-yard usually retails around $5.99/yard and can go up over $12/yard, depending on the detail and weight of the embroidery. This particular piece was heavily embroidered, and I only found one place where the stitching had come loose. The plain part of the fabric was slightly discolored, but for $1.00, I was willing to give my trusty Biz a chance. I'm making bloomers, so most of it will be hidden under a skirt, anyway.


The first step (after laundering) was to remove the rod pocket stitching from the top of the valance. I needed to do this to gain enough length to accommodate my pattern pieces. The stitches were rather large, so this only took a few minutes.


I used as my pattern. I cut a size 4, a bit bigger than my daughter is now, so her wearing time would be extended. Using the eyelet border means I don't have to hem the bloomers when I'm done...the finished edge of the eyelet will be the hem. Accordingly, I had to subtract the hem length from the pattern piece. Here is a pattern pinned on and ready to be cut. This is a multi-sized pattern, so you can see some of it is hanging over the edge of the fabric.


Here are the fabric pieces cut and ready to assemble.


I don't usually pin...(especially when serging)...but I wanted to match the eyelet at the bottom at the seam line, so pin, I did.


My serger made quick work of assembling these bloomers. Sewing, trimming, and finishing the edges in one step!


After serging the leg and crotch seams, the only remaining step was to turn the top down and apply some soft lingerie elastic to the waist. I prefer this method to making a casing and inserting the elastic; it's faster, and it is softer against the skin.


First, I measured the elastic by stretching it around my daughter's waist until comfortable. I stitched the ends together, then divided my elastic loop into fourths. I marked each fourth with a pin, then matched up the pins to the front, back, and side seams on the pants. Stretching the elastic to fit, I zig-zagged the elastic to the underside of the waist. It gathered the top as I applied it. I could have made the elastic loop a bit smaller...lingerie elastic is very soft, and did loose a bit of stretch after application. Mental note for next time.


And, Voila! One pair of lacy and feminine bloomers...for $1.00 plus thread and elastic from my "stash." Your cost may be slightly higher depending on your resources, but, still a very economical project. (Don't you just love those curled-up toes?)

By the way...does anyone know if you can even BUY bloomers anywhere? I'd be interested to know the cost.

REMEMBER: The key to successful repurposing is training your eye to look past what the item is...to what it could be.

Thursday, June 18, 2009

Sewing for Less - Repurposing

Sewing for your family can be expensive. Purchasing fabric, patterns, notions, and thread at full price can easily cost you more than buying ready-made clothing on sale, and much more than gently used yard sale clothing.

But, it doesn't have to be. There are a lot of strategies I use to sew things for less. One way I save money on supplies is to look for materials to repurpose. Adult-sized clothing (especially women's skirts and dresses) usually contains enough material to create a child-sized garment. I can always find high-quality clothing at our local Goodwill store for pocket change. The key is training your eye to see past what the garment is...to what it could be.


One of the internet fads right now is repurposing men's shirts into little girls' dresses. I found this shirt at our local Goodwill store for...$0.29. It is a high-quality, 100% cotton shirt. I chose it because this color is flattering to my daughter, the material was sturdy and stain-free, and, of course, it was cheap.


I decided to use New Look 6844 as my pattern. The first thing I did was position the pattern pieces to take advantage of the existing buttons and buttonholes, eliminating the need for a back zipper. I also had to re-draw the collar front to allow for the width of the shirt's front band. I see now that I could've extended it a bit so that the collar fronts would almost touch, but it's cute the way it is. I added some decorative stitching down the front, but I don't think it adds much.


This adorable eyelet trim I picked up at another local thrift store...a friend of mine tipped me off to a huge load of sewing supplies they received, and I came home with hundreds of yards of lace and eyelet trim for $17. Some was discolored from storage, but hot water and Biz brightened it up nicely. The collar, back tie, and sleeve band I made from a tone-on-tone cotton fabric in my stash, so it was essentially free. I removed the breast pocket, carefully, added a strip of eyelet, and repositioned it on the skirt.


The sleeves turned out Snow-White-ish, but Girlie loves the dress so I'd call the whole project a success.

So, here's the breakdown:
Men's shirt used for fabric...$0.29
Eyelet trim for pocket and sleeves...$0.10 (it's probably less)
Collar, belt, sleeve band fabric...FREE from my stash
Pattern...$3.50...but I will use it several times...maybe 4...$0.63
Thread...$0.50
And, Voila!...a toddler's dress for about $1.50!*


*Note: One thing I never do is factor in my time as a cost liability. Opinions vary on this aspect of frugality. Some people believe that large amounts of time should only be spent on the activities that are going to provide the greatest cost savings...things like home repairs, oil changes, haircuts, etc. The truth is that I can purchase toddler dresses at yard sales or thrift stores for a few dollars. So, why spend a few hours to create something that is only "saving" a dollar or two?

Mainly...enjoyment. I enjoy the creative process and bringing an idea to life.

Modesty is also an issue..I like my daughter in LONG dresses...they're hard to find!

I think it sets a good example for our children, to look for creative solutions instead of running out to buy what we want or need.

And, I also believe creativity is a gift from God, and that He is pleased when we use our gifts to serve and bless others.

I hope to explore some other areas of frugal sewing. I have several projects in the works and I'll try to post them as I get them finished. Please stop back!

Saturday, June 13, 2009

More Label Ideas...

I made some fancy labels for my jelly jars last week...like the labels I made for my spice jars a few weeks ago. I had to enlarge them slightly to fit snugly inside the canning rims. Now that I have them perfectly sized and formatted for the jars, it'll be a snap to label all my preserves this way. I created the image with a circle surrounding the olive branches as a cutting line. I had my younger sons cut them out...accuracy is not critical because the rim hides the cut edge. (Some people take the rims off after sealing, but I don't.) Besides looking pretty, the labels make a nice presentation, and I can place a few jars in a basket with a pretty card when I need a quick hostess gift.

Thursday, June 4, 2009

It's "Mint" to Be

My mother loves recipes. No magazine or newspaper boasting culinary instructions is safe from her recipe-clipping passion. My grandmother and I kid her about her binders and card boxes jam-packed with decades of delicious offerings...but WHO does everyone go to when they need a recipe? Exactly.

Mom also loves to garden. This week her mint was ready to be harvested...and after my boys helped cut it, we had filled a bushel basket! Now, what to do with it? We quickly decided to concoct a summertime family favorite drink...one of her fabulous recipe finds...Mint Orangeade.

Mint Orangeade
1 1/2 C sugar
1 C fresh mint leaves, lightly crushed
1 tsp shredded orange peel
2 C orange juice
1 1/4 C lemon juice
Ginger ale or Club soda, chilled

MAKE AHEAD PREP: In saucepan, combine 2 1/2 C water and sugar; bring to boiling. Pour over crushed mint leaves. Add orange peel, orange juice, and lemon juice. Cover. Let stand at least 1 hr. Strain, cover, and chill.

FOR EACH DRINK: Pour 1/3 C fruit mixture into tall glass, over ice, if desired. Fill with chilled ginger ale or club soda. Garnish with mint sprig.

Makes 6 C drink base.

Better Homes and Gardens, July 1981

But, wait...the recipe only requires 1 cup fresh mint leaves, and we had much, much more than that. Our solution? Make mint syrup. Here's how (using the preceding recipe):

Mint Syrup
In a saucepan, combine 2 1/2 C water and 1 1/2 C sugar; bring to boiling.
Pour over 1 C crushed fresh mint leaves. Cover, let stand at least 1 hour. Strain.

While mixture is standing, prepare quart canning jars, lids and rims. Then pour hot syrup (reheating if necessary) into hot jars, add lids, tighten rims until secure; invert jars. Jars are sealed when you hear lids "pop." Leave inverted until cool, then store until needed.

10 batches yielded 6 quarts of syrup.

Use Mint Syrup to make Mint Orangeade, or as a flavoring for hot or iced tea.
Enjoy!...It's delicious!

Mommy's Little Helper

Girlie loves to help out in the kitchen...and, for that, I am thankful. Today, she insisted on filling the ice cube trays, a seemingly constant job this time of year. (We like A LOT of ice in this family). She let the water fill each little cube space before moving on to the next one...I think her expression here demonstrates her level of concentration. (Of course, as soon as she filled it, she dumped it into the sink, she was wet and cold in a matter of minutes, and still, I had to do the job, anyway...but she had fun "helping.")

The dress she's wearing came from Goodwill earlier this week. It's about 3 sizes too big, but she loves it. I've been letting her wear it as a nightgown.

Saturday, May 23, 2009

The June Couple

This is a bridal shower gift I recently finished. In my post here I mentioned looking for a poem for a young friend of mine who will be getting married on my anniversary in June. While looking through an old copy of the works of Edgar Guest, I came upon the poem, "The June Couple." Thankfully, the poem was fitting for the young couple, and conveyed the proper sentiments, so I set out to find a way to present it to the bride as a gift.

I was able to find this lovely frame at a thrift shop...it had a Nolan Miller dress design print in the center which I discarded. The frame was originally a tacky, silvery/goldish color, so I used one of my favorite trash-to-treasure tricks and painted it with black acrylic paint, making sure to get it into all the crevices, then wiped some off with a cloth, just leaving highlights of the original color showing through. It set off the intricacy of the frame's carved design, and toned down the harsh metallic finish. Black paint is a bargain-hunter's best friend!

Next, I formatted the poem on an 8 1/2 x 11 sheet of cream paper, which I trimmed down slightly. This was mounted onto a sheet of pumpkin-colored mulberry paper which was then trimmed to fit and glued into the inner frame. I added a strip of taupe velvet ribbon and a paper flower I purchased from Michael's scrapbooking section.

I washed the glass and reassembled the elements and used a reproduction victorian floral wrapping paper (a previous find from the thrift store) for the backing.

This was one of those projects that I didn't feel particularly inspired about, but I am pleased with the finished product. I hope the bride and groom display it in their new home and that the message of the poem will speak to and encourage them often.

(You can click on the photo to enlarge it and read the poem.)